LED Chaser Circuit
I don't know why, but people like blinking lights. You see LED chasers everywhere, in TV shows (Knight Rider), movies, and store windows. This schematic is my version of a simple 10 LED chaser. There is no 555 timer used because at my local electronics store they are over $4 Cdn. Instead, an oscillator made up of two sections of a 4011 NAND gate is employed. This chip is very inexpensive and extremely common.
Circuit diagram
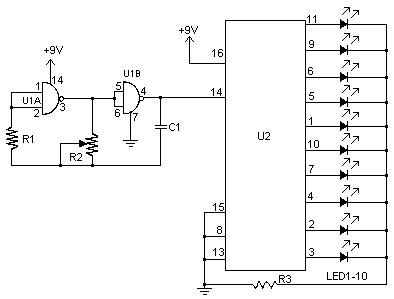
Parts:
R1 1 Meg 1/4W Resistor
R2 100K Pot
R3 1K 1/4W Resistor or 220Ohm if using blue LEDs
C1 0.1uF 16V Ceramic Disk Capacitor
U1 4011 CMOS NAND Gate
U2 4017 CMOS Counter
LED1-10 LEDs Of Any Colour
MISC Board, Sockets For ICs, Knob For R2
Notes:
1. Use R2 to adjust the "chase rate".
2. You may need to use a lower value resistor if you wish to use blue LEDs. Try 220 Ohm.
3. You can also use incandescent lamps instead of LEDs. Use transistors to drive them by connecting the base of the transistors to each of the outputs of the 4017 through a 1K resistor. Connect one end of the lamp to the positive supply. Then connect the other end to the collector of the transistor. The emitter then goes to ground. Depending on the lamps, you may need power transistors that are heat sinked.
4. C1 may be replaced with a larger value for a slower "chase rate".
5. If you have problems with weird circuit behavior, try replacing R1 with a 33K resistor, and increasing C1 to 1uF.
6. If you plan to use this circuit in your car, be warned that in some areas it is illegal to have red, blue or yellow flashing lights unless you are an emergency vehicle.
Author:
website: http://www.aaroncake.net